📲 Welcome
Do you want to welcome the new user with a welcome post sent automatically by Channel Help or even by your personalized bot?
Do you need to make your channel really private but Telegram does not allow it?
You are in the right place.
With the Welcome feature you can create a post consisting of text, media and buttons that will be sent automatically whenever a new user joins your channel.
This could be useful for various reasons, one of many could be wanting to inform the user of certain things before he starts viewing the channel. However, your channel must be private with approval link.
You can also create your own bot with a personalized name, username and image, which will send the welcome post instead of Channel Help!
And there's more: using the Welcome feature you can make your channel really private, that is, a user will not be able to see its contents until he has signed up. Telegram inevitably does not offer this possibility since it allows two options:
• Make the channel private with the approval link: your channel is effectively private, but you will have to manually approve every single subscriber each time and with potentially large users it could be unsustainable.
• Make the channel private without approval links: if your channel has more than 200 subscribers it is not really private, as it will be possible for all users to see the contents of the channel for 5 minutes without having to subscribe.
The definitive solution can be obtained with Channel Help, by choosing the first option and having the bot automatically approve the users who want to subscribe. By doing this, a user will not be able to see the contents of the channel until he has signed up and you will not have to manually approve each individual user!
Create links with approval
Links with approval allow you to invite users to a private channel, without them being able to enter and/or view the content of the channel until they are approved by an administrator or a bot. With Channel Help, you can automatically approve all users who use a link with approval.
To create a link with approval you need to:
go to the channel settings menu
access the "Invite links" section
press "Create a New Link"
activate the option "Request admin approval"
press "Create"
copy the link that appears and send it to users!
Configuration
Let's see how to proceed:
First of all, as we can read in the bot message, it is necessary to make the channel private with approval link.
Next, you can choose which features to configure for the Welcome in the channel:
📩 Welcome Post – Send a message to new members upon joining.
🔓 Self-approval – Automatically approve new members without manual review.
🧠 Captcha – Require users to complete a captcha to verify they are not bots.
🔑 Force Join – Ensure users subscribe to a specific chat before joining.
🤖 Custom Bot – Use a personalized bot to greet new members.
⛔️ Join Filters – Apply specific conditions to control who can join.
📩 Welcome Post
Let's first activate the Welcome Post:
Now, press on Welcome Post to begin the configuration:
Welcome post
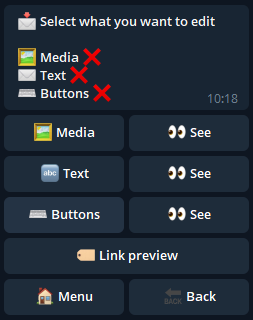
For the welcome post you can set:
Media: photos, videos, GIFs that we can use as the basis of the post or to attach at the end of the text.
Text: the text of the message; if we decide to also set the media, the text would become the caption.
Buttons: buttons to add at the end of the post.
For each option there is a "See" button that allows you to see what has been set in each of the cases.
The Link preview button is used to activate the preview of the first link that we insert in the text and it is necessary to activate it in case we want to attach a media.
Let's see for example how to set up a media:
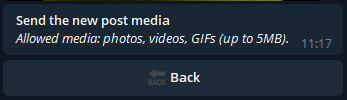
Once pressed on media you need to send a photo, a video or a Gif (up to 5MB).
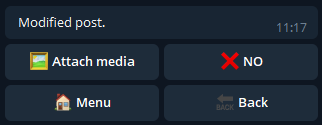
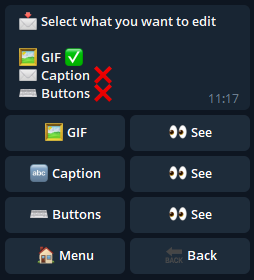
Once the media has been sent, you can attach it, making it position at the end of the text instead of at the beginning. If the operation is successful, a green check will appear and the word "Media" will become "Photo" or "Video" or "GIF" depending on what has been sent to the bot.
🤖 Welcome with custom bot - The best welcome for new members
To use this feature you must have the 🟠 PLUS plan or higher.
Do you want to welcome the new user with a welcome post sent automatically by a your personalized bot?
You are in the right place.
To set up a custom bot, access the "Welcome" section, then after selecting "Custom bot" we arrive at the menu where we can: set up one or more custom bots, decide for the channel we have chosen at the beginning which will be the bot that will send the welcome post and finally remove one of the set bots.
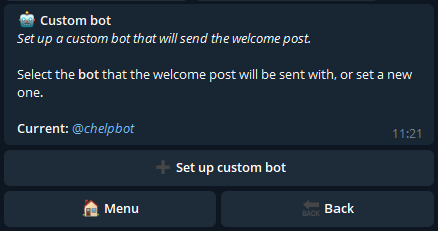
Pressing on "Set custom bot" we arrive at the following menu:

How to create a bot
Follow the instructions sent by Channel Help, and if the procedure is successful you will have confirmation that you have set your bot as a custom welcome bot.

Bot not added to channel
Attention: your bot must also be added to the channel (in the same way you added Channel Help) for it to be operational.
If you haven't already added it, going back will bring you to the start menu where Channel Help will still be the selected bot:

Only after adding your bot to the channel will you be able to select it and set it as the default.

🔓 Self-approval
With this feature, you can manage user approval requests in your channel.
First, let's activate the feature, allowing the bot to handle the approval requests for you:
Next, we need to decide which Auto-approval configuration suits our needs.
⚡️ Immediate approval
With this feature, the bot will immediately approve every user request to join the channel.
🕓 Timed approval
To use this feature you must have the 🟠 PLUS plan or higher.
With this feature, you can set a time period after which a user who requests to join the channel will be automatically approved by the bot.
For example: Let's configure the approval in the channel so that a user who requests to join will be approved after one hour.
First, let's activate the feature:
Next, select 1 hour:
Finally, press Next to complete the configuration.
From now on, all users who request to join the channel will be automatically approved after one hour.
✋ Bulk approval
To use this feature you must have the 🟣 PREMIUM plan or higher.
This feature allows you to manually approve a certain number of users all at once at a later time.
Once the feature is activated, the bot will save all access requests to the channel and display the total number of requests in the main menu.
We can see that 2 users are awaiting approval.
By pressing the first button, we can approve a specific number of users in the queue.
By pressing the second button, we can approve all users awaiting approval.
Let's press the second button, for example:
The bot will ask for confirmation to approve the 2 users waiting.
Once confirmed, we will need to wait for the operation to complete, as it may take some time depending on how many users we are approving.
If the operation is finished, we will return to the initial condition in the main menu. Otherwise, the bot will inform us how many users are still pending approval.
🧠 Captcha
To use this feature you must have the 🟠 PLUS plan or higher.
With the Captcha function active, you can filter access to the channel by limiting it to only “real” people.
In fact, users will have to solve a mathematical calculation, i.e. Captcha, to be approved in the channel.
In order to use the Captcha function, you must have configured a customized Bot.
Once the Captcha is activated, you can configure it by pressing the Captcha button on the left:
Captcha post
With the Captcha post you can customize the post that will be sent before the captcha to users who request to join the channel.
The standard welcome post will be sent after solving the captcha.
We then activate the Captcha post with the right button and then press the left button to configure it:
In order for the post to be sent, in addition to its activation, it is necessary to set at least a text or a media.
Captcha Expiration
Through this menu you can define the time that a user has to solve the captcha before his request for access to the channel is automatically rejected:
The default expiration is 1 hour.
Warning: If the custom bot is connected to an external service (other than ModularBot), the captcha will not work!
Integration with ModularBot
Connect your custom bot to ModularBot as well to improve user interaction via broadcast messages!
🔑 Force join
To use this feature you must have the 🟠 PLUS plan or higher.
With this feature, you can require all users to subscribe to specific chats (groups and/or channels) in order to be approved in your channel.
Let's activate the feature first:
Next, let's go to the main menu, where we can add the chats that users must subscribe to in order to join our channel.
Now, let's add a new chat by pressing Add:
First, let's add @ChannelHelp as an administrator to the chat in question.
Then, retrieve the link to a message in the chat by pressing or holding down on the message and selecting the Copy Post Link button.
Next, send the copied link of the message from the chat to the bot.
If we follow these steps correctly, the bot will confirm that the modification has been made.
We can verify that the addition was successful by returning to the main menu.
If we have more than one chat, we can decide the order in which they will appear to the users.
Press the 🔼 arrow of the second chat:
We can see that the second chat is now at the top of the list, and it will be the first chat users see when they try to access our channel.
🛡️ Join Filters
CLICK HERE to read the Ingress Filters guide.