📚 Multipost
To use this feature you must have the 🟠 PLUS plan or higher.
Multipost - The ultimate feature for organizing posts
If your channel has a fairly tight posting rate and it starts to be difficult to repeat the process of creating a post over and over again, this feature is for you.
In fact, with Multipost you can create several posts all at once, much more efficiently than the standard method. Not only that, creating them all together allows you to decide once and for all when they will be sent, if immediately, on a specific date, or according to your publication calendar.
Multipost is one of the paid features available starting from the Plus plan.
Configuration

Multipost starting menu
Once the channel has been selected, we arrive at the initial menu of the feature, in which the general settings of the set of posts to be created will be chosen.
You can in fact decide the classic settings of the posts, but also if we want the signature of the channel to be added to each post to be created.
Finally it is possible to create a publication calendar which we will discuss later.
Once the initial settings have been decided and pressed on "Next" we arrive at the second menu of the feature:

Multipost second menu
At this point in order to proceed it is necessary to make a decision both for the buttons and for the reactions of the set of posts.
Default: in the event that each post to be created must have the same buttons and/or the same reactions, press this button and send the buttons/reactions to the bot that will become predefined for each post.
Always ask: if each post should have different buttons and/or reactions, this is the button to press.
Do not ask: this is instead the case in which for each of the posts of the set no buttons and/or reactions must be added.
Once you have decided how to proceed, simply press next to get to the first step of creating a post.

First step
At this point, as for the standard creation procedure, it is necessary to send what is needed to create the first post of the set.
Once you have sent everything you need, we arrive at the final menu of the newly created post.

Concluding menu of the post
It is now possible to decide how to proceed between 4 options:
Next post: start the creation process again for the next post
End multipost: finish the creation of the set of posts; this is the option to choose in case there are no other posts to create.
Stop and cancel: permanently cancel the procedure by deleting all the posts created so far.
Restart post: restart the creation of the current post from the beginning.
Then by pressing the "End multipost" button we arrive at the final menu of the feature in which various options are available that allow you to:
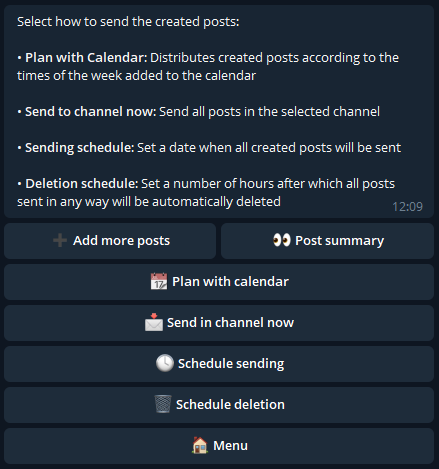
Final menu
Add more posts: go back to the post creation process.
Post summary: check the posts created so far and, if necessary, delete those that have not been created correctly.
Send in channel now: send all posts created in the selected channel at the beginning.
Schedule sending: decide a specific date on which all posts will be sent. Once the date is set, the button above will become "Schedule in one channel".
Schedule deletion: send the bot a number of hours after which posts will be automatically deleted from the channel in which they were sent.
Plan with calendar: distribute the posts created according to the publishing times added to the calendar previously created.
Publishing Calendar
If your channel publishes multiple posts at the same times on specific days of the week, creating a publishing calendar is the optimal choice.
Once you've set the publishing times for each day of the week, you'll be able to create as many posts as you like and let the bot distribute them on the selected days and times, saving you from having to create and schedule each post manually.
For example: if you’ve added 3 PM on Monday and 4 PM on Wednesday as publishing times in the calendar, and you create 6 posts choosing the "Schedule with calendar" option at the end of the Multipost process, the 6 posts will be automatically scheduled for all Mondays at 3 PM and Wednesdays at 4 PM over the next 3 weeks. If the posts were 8, the schedule would span 4 weeks; if 10, it would cover 5 weeks, and so on.
Let’s now see how to create the calendar:
Tap on "Add" and send the name of the calendar:
Then tap on the calendar you just created to set its publishing times:
So we select the day of the week on which to add a publishing time, for example Sunday.
After tapping on "Add time", you then need to send the time to the bot in one of the two possible formats as shown in the example, namely standard and AM/PM.
If the second format is chosen, you must separate the time and AM/PM with a space.
You can send multiple times at once by going to a new line between each one:
Going back, we can verify that the 3 submitted times have been correctly added for Sunday:
When all the publishing times have been added, the calendar creation will be complete. At any time, however, it will still be possible to edit the calendar by adding new times or removing existing ones.
Calendar Scheduling
Once our calendar or calendars have been properly configured, we can use them to schedule the posts created with Multipost.
At the final menu of Multipost, we can choose the option “Plan with calendar”:
Then we choose which calendar to use for scheduling our posts:
We can then decide how to schedule all the created posts according to the calendar's weekly pattern:
Starting from now
Starting from a future date
In the first case, the posts will be distributed from the first time set in the calendar starting from now.
So, if the button is pressed on a Wednesday and the calendar has a time set for Thursday, the first post will be scheduled for Thursday, and all the others will follow accordingly.
In the second case, however, we want the first post to start from the first time of the following week instead of the first available one; for example, we can send midnight on Monday as the future date. This way, the posts will be distributed according to the calendar, but starting from the chosen date (next Monday) instead of the current one.