📨 Create posts
Create posts - Make your channel professional
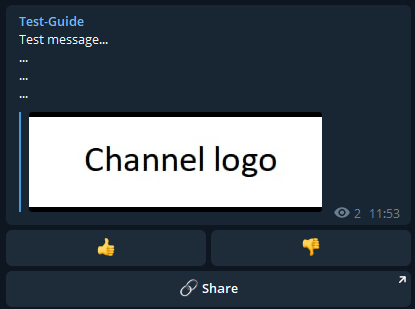
Create Post is the main feature of Channel Help. It allows you to create more elaborate messages, called posts, which cannot in any way be created manually. Creating and sending a post instead of sending a normal message makes your channel more professional, as it gives you more creation and organization options; It is possible, for example, to replace links inserted at the end of the text with actual buttons containing these links, or to attach the logo of your brand at the end of the message.
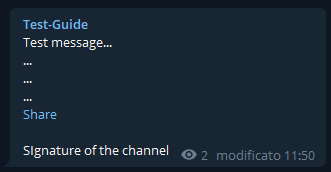
You can then switch between a normal manually created message:
To a post created with Channel Help:
But the Create post feature is not limited only to this, it also allows you to manage what happens after the creation of a post. In fact, it is possible to decide to schedule the sending and/or deletion of a post in a channel, pin the post at the top or possibly save it to send it at a later time.
Finally, for users administering more than one channel with Channel Help, it is possible to send a post simultaneously in multiple channels.
Creating a post
Let's see now how to create a post:
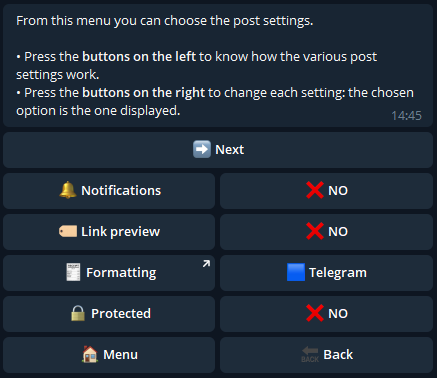
This menu contains the initial settings of the post:
Notifications: the post will send a notification to the users of the channel.
Link preview: the preview of the first link of the post will be shown (if present).
Protected: the post cannot be copied or forwarded by channel users.
Formatting: the formatting used for the textual part of the post.
Formatting options
With Channel Help you can use the following formatting options for post text:
Telegram
Using this formatting option it's possible to send to the bot a message already formatted with the Telegram features.
HTML
Using this formatting option it's possible to use the Telegram markup functions with the addition of the following HTML tags:
<b>Bold</>
<i>Italic</>
<u>Underlined</>
<s>Strikethrough</>
<a href='www.link.com'>Hyperlink text</>
<code>Monospaced</>
<sp>Spoiler</>
<m>Typewriter</> -> 𝚃𝚢𝚙𝚎𝚠𝚛𝚒𝚝𝚎𝚛
<f>Encoded</> -> Encoded
<br> -> New line
<dot> -> •
<inv> -> Invisible characterNote: it's possible to combine multiple tags.
Markdown OLD
Using this formatting option it's possible to use some of the Telegram markup functions (bold, italic, hyperlink, monospaced) with the addition of the following Markdown tags:
*Bold*
_Italic_
[Hyperlink text](www.link.com)
`Monospaced`Note: it's possible to combine multiple tags.
Markdown NEW
Using this formatting option it's possible to use the Telegram markup functions with the addition of the following Markdown tags:
*Bold*
_Italic_
__Underlined__
~Strikethrough~
||Spoiler||
[Hyperlink text](www.link.com)
`Monospaced`Note: it's possible to combine multiple tags.
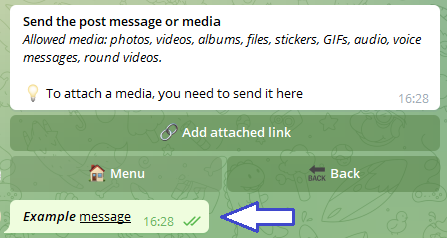
Text message or post media
From this point on, the bot will ask for the elements that will compose the post to be created and in each step it will send the preview of the post.
In the first step the bot asks to send a text message or a media:
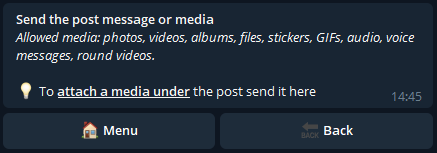
In the case of a text message, it is necessary to pay attention to what we write based on the chosen formatting.
If we choose HTML, for example, by sending the message "<a href" we will be stopped by the bot with an error message:
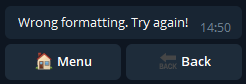
At this point, just send a correctly formatted message and we will proceed to the next step.
In the case of a media, however, it is necessary to be careful to send one of those allowed, as we can read from the message sent by the bot. In case we send unsupported media, we will be stopped by the bot with an error message.
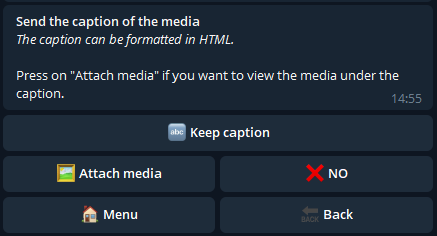
Once the media has been sent, we proceed to the next step, for which, if supported, the caption must be decided:
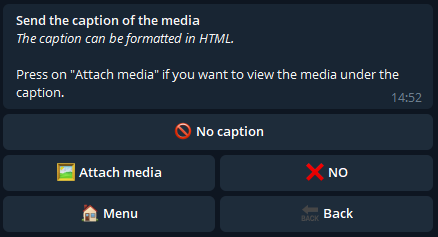
We can then send the caption we want for the media, or press "No caption" to not insert it.
Also, you can press the "Attach Media" button, which will allow you to attach the media at the bottom of the post. In that case, however, it is mandatory to send a caption.
The two cases are shown below:
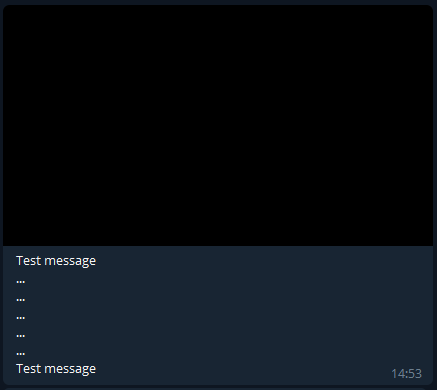
Standard Media

Attached media
Finally, it is possible to forward a media from another chat, deciding whether to keep the caption it had or send a replacement.
Buttons
CLICK HERE to find out how to create buttons and add them to your post!
Final Menu of Create Post
Once the post has been created, we reach the final menu of the Create Post function:
In this menu, there are several options that can be selected for the post you just created:
Reply Message
Save Post
Recurring Post
Schedule Sending
Schedule Deletion
Send Post/Send Post to More Channels
Reply Message
In this menu, you can choose a message from any chat to which the post you're creating will respond. First, the bot must also be an administrator of that chat. Then, you need to send the link of the chosen message:
After sending the link, we can check if the reply message is the correct one and, if so, confirm it.
Save post
By clicking on this button, the post you just created is saved to be sent at a later time. You will find your saved posts in the My Posts menu.
Schedule sending
By clicking on this button you can send the date on which the post will be sent in the channel. The date must be sent in one of the formats in the example:
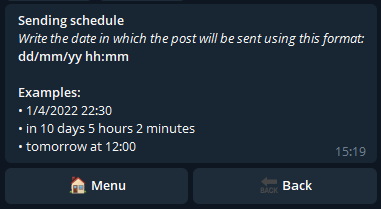
It is not possible to send a date prior to the present and it is not possible to send a date after the one relating to the deletion schedule (if present).
Schedule deletion
By clicking on this button you can send the date on which the post will be deleted from the channel. The date must be sent in one of the formats in the example:

It is not possible to send a date prior to the present one and it is not possible to send a date prior to that relating to the sending schedule (if present).
Also, if a date is sent that exceeds 48 hours after the post was sent to the channel, it cannot be deleted, but Channel Help will send you a reminder to remind you to do it manually.
Send posts/send posts to more channels
With Channel Help it is possible, after creating a post, to decide whether to send it in one or more channels simultaneously.
In the first case it will be sufficient to select a channel to proceed to the next menu.
In the second case it will be necessary to select the channels in which to send the post and then click on "Next" confirming the choice.
In both cases you get to the next menu, where the bot shows the summary of the channel or channels in which the post will be sent and allows you to add Signature and Reactions.
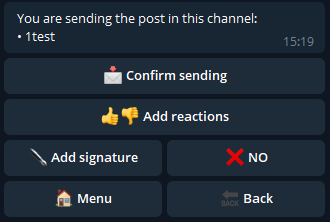
Finally, by pressing on "Confirm sending" the bot will send the message in the chosen channel or channels.
Reactions
Reactions are special buttons that allow subscribers of your channel to leave feedback on the post they are added to.
To add them to the post, you need to send a text or an emoji for each reaction, separating them with a space. A maximum of 10 reactions can be added. To send them on multiple lines, you need to go to a new line between each one:
Alternatively, you can press one of the suggestions the bot offers based on reactions previously added to the channel.
After sending or selecting the reactions for the post and confirming, you will be able to verify the correct addition.
Signature
You can add your signature to the post by clicking on the "Add signature" button. However, this button will only appear if it has been set in the settings menu.
Conclusions - Alternatives to Create Post
The Create Post function is the main function of Channel Help that allows you to create posts to be sent in one or more channels. But in some situations it can make the creation and scheduling of posts particularly long or even unsustainable.
For channels where it is necessary to create many posts together and perhaps organize them according to a publication calendar, the Multipost feature is available!
For those channels where text messages are constantly published in which the additions of the message are always the same, such as the logo or signature, the Auto-complete feature is ideal for automating the channel!
Finally, in those cases where it is necessary to repeatedly send a certain post in the channel, but repeating the creation procedure each time with Create post becomes unsustainable, the Recurring Posts feature solves all your problems!